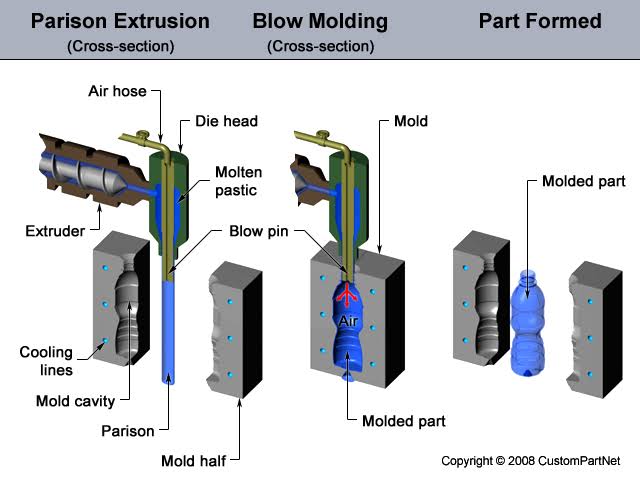
Extrusion blow molding is commonly used to form and join hollow plastic items used in packaging and industrial applications such as plastic ducting, tubs, and drums. The compressed air component makes the process different from standard injection molding, which is typically used to create solid objects. The molding process begins step-by-step forming the soft, molten plastic into a tube-like structure, using an extrusion machine to make a hole in one end for compressed air to pass through. This heated plastic tube is called a parison. The parison is then poured into the mold and a final, hollowed-out shape is created to allow compressed air to push the plastic out.
The focus of this guide is the blow molding process and its extrusion. Because there is never a chance that the two designs are alike, so the process and mold should be optimized and adjusted in each plastic design. The software can help estimate product molding characteristics and our engineers are here to help you get the best of your product.
There are seven steps to follow to do the molding completely and completely. The detailed guide for this type of process is given below:
- Blow-Molding Process
- Materials
- Parison Capture
- Shrinking and Wrapping
- Cooling
- Venting
Let’s dive into the details and steps followed to get these 6 points done in no time for the perfect production.
Blow-molding process:
- The first step of the plastic is being extruded by mixing, pushing, and melting it into the tube which is called parison and is used to make different parts.
- A mold is used to shape the part as per your wish. The mold consists of two parts that close around the melted parison.
- To expand against the surface of mold the molten plastic is blown inside through air.
- To get into a new shape, it is preferred to let the mold cool so that the plastic can be set.
- The last step is that the molded part of plastic is separated from parison and removed from the mold then it is finished after being separated from the flash.
Materials:
Although there are thousands of plastic materials available, most do not meet the needs of your product. It is essential to have experience with grade materials for molding. Plastic manufacturers can guide you through suitable materials. Following things matter a lot in the field of molding so whatever material is used you should check the following to get the best idea of what to use and what not to use:
- Plastic resin properties
- Material cost
- Processing properties
- Objectives of your ending
Parison capture:
To design a molded product, you must understand the interaction between the molten plastic parison and the mold. If you’ve blown a bubble with bubble gum you can understand blow molding. Plastic material spreads like glue and if it gets too thin it will burst. It is easy to form a bottle-shaped part of the tube since the parison is extruded as a tube that too without a stretch. Two molds are opened, the parison is poured, the mold is halved, and the part is blown away. The division between the mold parts is known as the parting line. The parting line around the portion size often has a knife-like edge known as a pinch-off.
Soft plastic can only stretch for a short distance before becoming thinner. Like bubble gum, the first thin spot is the weakest, and it thins the fastest until it bursts. If the plastic parison pops it is called a “blow-out” and results in no parts being formed.
Shrinking and wrapping:
The best predictor of materials for PE and PP is the thickness of the material. The shrinking capacity depends upon various factors such as the thickness of the material, temperature changes, etc. Thin-walled parts can shrink up to 1% and thicker parts can shrink by more than 10%. The .060″ thick part will shrink by about 1.65% when it cools, and the .125″ thick part will shrink by about 1.85%. The shrinkage expectation should be considered when determining mold size.
Cooling:
To control the dimensions, surface appearance, and munitions, it is important to have as much control as possible over the cooling of the part. Cycle time and heat removal are majorly affected by flow rate. By creating a turbulent flow, heat extraction and cycle times can be improved. To control warpage in many designs, it is essential that mold cooling is targeted to provide additional heat extraction to the heavy wall portions of the part. The quality of the part is also affected because of the overall flow pattern. The water becomes hot as it flows through the mold.
Venting:
The venting can be conveniently located on the edge of any of the inserts in the cavity. Slotted vent inserts or porous metal can be purchased and fitted in almost any space. Some venting methods may have an effect on the marketing of the finished products that it is visible at various points. Vent locations may mark the product but minimize the effect many techniques which include inserts and textures may be employed.